Creating an E-Commerce Web Account
Creating and authorizing a Web Account manually involves the following steps:
- Creating a new Web Account card and filling in fields
- Generating the initial password and (optionally) sending a welcome e-mail to the customer
Creating a Web Account Card
Step 1:
Navigate to Web Accounts list in Dynamics NAV, and click New. A blank Web Account card will be opened.
Step 2:
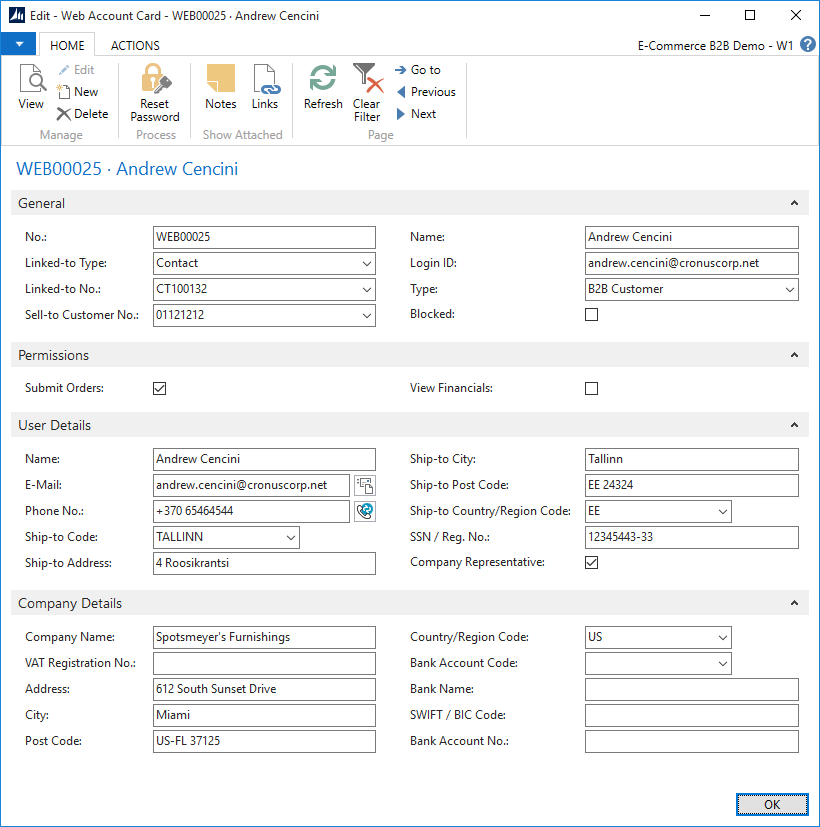
Fill in the account details on the Web Account Card.
The Web Account Card contains information related to:
- the account in general - sign-in ID, E-Commerce settings and permissions
- details of the person using the account (User Details section)
- details of the company the person is purchasing on behalf of (Company Details section)
While the Web Account will be linked to a Contact and a Customer card in most cases, and duplicate the information available there, it can also be used independently, e.g. in B2C scenarios, where there is an e-commerce account for a customer, but you have not created the respective Contact/Customer cards yet.
A sample Web Account card is displayed on the following screenshot, with the field reference following:

| Field | Mandatory | Description |
|---|---|---|
| No. | Yes | The internally-used code of the Web Account card. Typically linked to number series and automatically assigned by Dynamics NAV. |
| Linked-to Type | Yes | Specifies whether this Web Account is linked to a Contact card, Customer card, or Standalone (not linked). |
| Linked-to No. | Yes* | If this Web Account is linked to Contact or Customer, which respective Contact or Customer it is linked to. Should be blank for Standalone Web Accounts. Upon selecting a code in this field, the system will populate most of the remaining fields using the information found on Contact or Customer cards. |
| Sell-to Customer No. | Yes | The Dynamics NAV Customer card No. that is used for determining the product pricing for this Web Account. This is mandatory for any (incl. Standalone) Web Accounts in order for sign-in to work. |
| Name | Yes | Name of the account. Typically, the full name of the person authorized. |
| Login ID | Yes | The sign-in identified used by the account to sign in. Typically equal to person's e-mail address, but can be changed if neccessary. |
| Type | Yes | Specifies the checkout mode that will be presented to the customer when placing orders. B2B Customer - the system will generally assume you already have the customer/company details, shipping addresses etc. in Dynamics NAV and the customer will select from the ones available, speeding up the checkout process. B2C (registered) - the system will assume the customer is not related to a particular Customer card and only use the information available on Web Account card for shipping addresses etc. B2C (registered) mode will give the customer a chance to update the shipping address upon placing each order, while only the last shipping address will be stored. B2C (not registered) - should be set for the generic “unregistered” Web Account card. |
| Blocked | You can place a Blocked checkmark to temporarily disable the sign-in for this Web Account. | |
| Submit Orders | Specifies whether the account is allowed to place e-commerce orders. Normally set to Yes, but can be removed for scenarios where there are customer accounts that prepare the orders (save Drafts), and other accounts that review, approve and place the orders. | |
| View Financials | Specified whether the customer-wide financial information is displayed to the account. If set to Yes, E-Commerce displays financial summary sidebar and issues warnings in Shopping Cart and History pages, and also displays Financials page - list of posted invoices, payments and other documents from Customer Ledger Entries. | |
| Name | Yes | Name of the account. Typically, the full name of the person authorized. |
| Yes | E-mail address of the account. Used by E-Commerce for automated e-mails. | |
| Phone No. | Contact Phone No. of the account. | |
| Ship-to Code | You can select the default Ship-to address for each of the accounts from the list of Ship-to Addresses available for the Customer card. | |
| Ship-to Address | Ship-to address, according to the selected Ship-to Code. | |
| Ship-to City | Ship-to city, according to the selected Ship-to Code. | |
| Ship-to Post Code | Ship-to post code, according to the selected Ship-to Code. | |
| Ship-to Country/Region Code | Ship-to country or region code, according to selected Ship-to Code. | |
| SSN / Reg. No. | Person's ID or social security number that is printed on sales documents. Required by some legislations. | |
| Company Representative | Should be set to Yes if the person (User Details section) transacts on behalf of a company (Company Details section). | |
| Company Name | Yes* | If Company Representative is set to Yes, the name of the company. |
| VAT Registration No. | EU VAT No. of the company. | |
| Address, City, Post Code | Legal address of the company. | |
| Bank Account Code | Bank Account Code of the company. You can select from the ones available for the Customer card. | |
| Bank Name, SWIFT Code, Account | Company's bank details. |
Generating the Password
You use the Reset Password function on the Web Account card to create the initial password and thus enable authentication on https://your-ecommerce.com. This function will create (or replace) the customer's password and offer you to send a welcome e-mail including e-commerce URL and other access details.
You can also use this function if a customer asks you to reset the password, e.g. fails to use the password recovery functionality available on the e-commerce website.
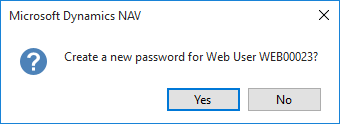
Clicking Reset Password will present the following dialog:

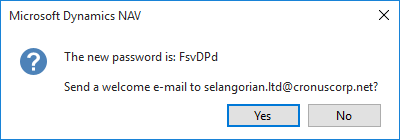
Clicking Yes will generate the initial password for the new Web Account and the next dialog will offer to instantly e-mail the welcome message to the customer, including the e-commerce site URL and account details.

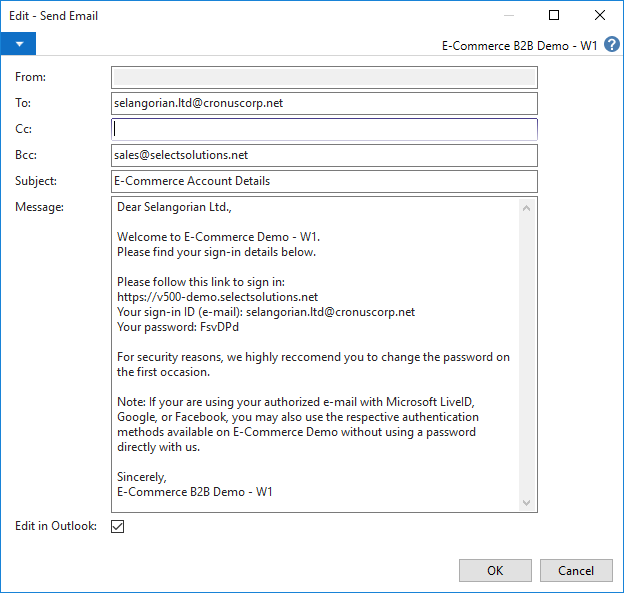
Clicking Yes will compose the e-mail message according to the template you have set up, and present the standard Dynamics NAV e-mail dialog:

You can alter the e-mail text if neccessary, or click OK leaving the Edit in Outlook checkmark placed, which will open the e-mail in your Microsoft Outlook, where you edit and send the e-mail at your convenience. If you do not have Microsoft Outlook installed, clicking OK with Edit in Outlook checkmark removed will send the e-mail using the Dynamics NAV Server. Alternatively, click Cancel to skip sending the welcome e-mail.
You have now successfully authorized the customer, and the customer may sign in at https://your-ecommerce.com.